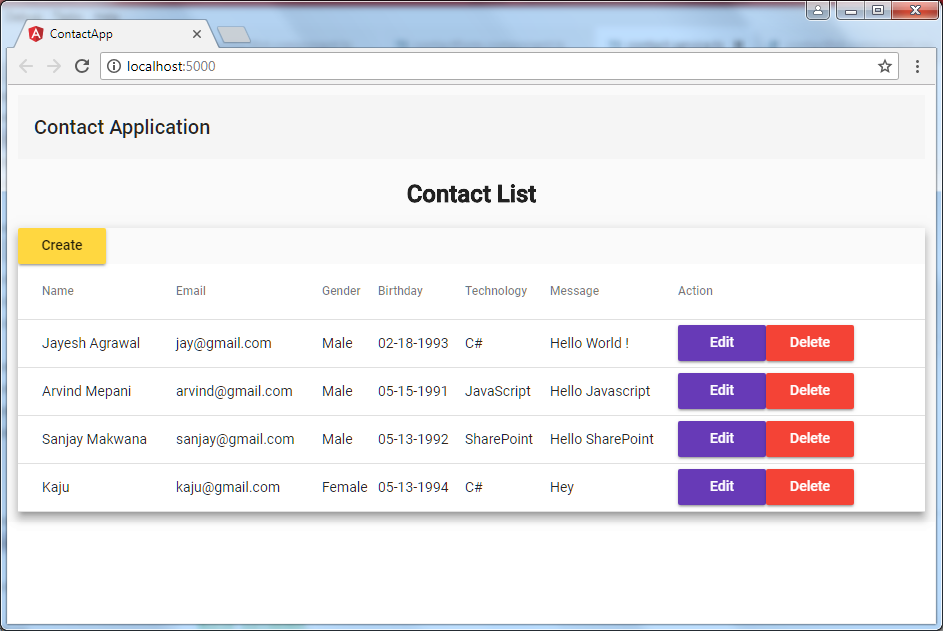
Contact Application Azure Deployment ASP.NET Core Web API, Angular 6 Using Visual Studio Code
In this article, we are going to deploy/host a contact application with Visual Studio code to Azure web apps.
Before proceeding with this article I would like to request you that please go through the first two parts of contact application:
- Contact Application using ASP.NET Core Web API, Angular 6.0, and Visual Studio Code Part One
In the article, we will set up ASP.NET Core Web API project, and develop the Web API for contact CRUD operations. - Contact Application using ASP.NET Core Web API, Angular 6.0, and Visual Studio Code Part Two
In the article, we will setup Angular 6 within ASP.NET Core Web API Project, and develop the contact form & list component using Angular Material UI that will consume Web API which we have created in Part One.
Let’s start with database deployment as Azure SQL databases.
- Login to Azure Portal.

- Go to left navigation on SQL databases. It will open a popup for SQL databases.
- Click on Add or Create SQL database Button.

- It will open a form where we need to specify SQL Server Instance, Resource group etc. Here, we can create new SQL Server Instance with admin user if we didn’t have an already existing SQL Server Instance.

- Then, we need to configure Price Tier for SQL database as per our requirement. Currently, we have selected Basic Price Tier for this.

- Here we also tick pin to dashboard option in form and Click on create a button to submit for Azure SQL Database deployment.

- It will deploy Azure SQL Database & Server and will take a minute to deploy SQL Server.

- We can see SQL Database pinned to dashboard after successful deployment of SQL Database. Click on “contactapp” SQL database from the dashboard. It will open “contactapp” SQL database page and left side navigation will have various options to manage SQL database. Here, we can see the connection of string to connect “contactapp” database.

- Now, we have two main options to create “contact” table in Azure Database.
We will go to Query Editor Option from left navigation. It will ask for SQL Server Login.

We need to run following script to create contact table in SQL Database.

Option 2
- SET ANSI_NULLS ON
- GO
- SET QUOTED_IDENTIFIER ON
- GO
- CREATE TABLE [dbo].[Contact](
- [id] [bigint] IDENTITY(1,1) NOT NULL,
- [birth] [datetime2](7) NULL,
- [email] [nvarchar](max) NULL,
- [gender] [tinyint] NOT NULL,
- [message] [nvarchar](max) NULL,
- [name] [nvarchar](max) NULL,
- [techno] [nvarchar](max) NULL,
- CONSTRAINT [PK_Contact] PRIMARY KEY CLUSTERED
- (
- [id] ASC
- )WITH (PAD_INDEX = OFF, STATISTICS_NORECOMPUTE = OFF, IGNORE_DUP_KEY = OFF, ALLOW_ROW_LOCKS = ON, ALLOW_PAGE_LOCKS = ON)
- )
- GO
We will replace Azure database connection string in app setting of contact application code. Then, apply Code first migration to update table in Azure database on server using this command in VS code terminal:
Create Azure Web Apps for ASP.NET Core
Here we go to App Service from left navigation in Azure Portal. These will vshow arious web apps templates for the deployment of specifying web apps.


- In this case, we select ASP.NET Core. It will open Web Apps Popup to configure web apps information and create Web Apps for our contact application.
- Now, we will open Visual Studio code.
- Go to the Extensions and search Azure extension.
- Select Azure Extension Pack and install it.
- We need to reopen VS code after installation of Azure Extension Pack. Then we can see Azure icon available in the left navigation of VS code as shown in the below screenshot:
- Click on plus button in App Service header to configure Azure web apps with contact application.
- It will ask for you to sign in to Azure. Then we can see the popup for device authentication in right-bottom corner of VS code. Click on “Copy & Open” button.
- Enter past code and click on continue button.
- Now, we can see Contact Application Azure web apps under App Service in VS Code.
- Publish ‘Contact-App’ application code though VS code terminal and note the publish folder location.
- Right click on “Contact Application” and go to deploy web app option.
- It will ask folder location for deployment. We need to select publish folder location.
- It will start deployment. We can see deployment log in VS code output window. After successfully completing deployment it will show completion message & Web App URL.
Conclusion
In the article, we have shown detailed steps of deploying Contact Application using Visual Studio Code to Azure web apps and Azure Database.
Please shrare your feedback on this.


Azure app meet rigorous performance, scalability, security and compliance requirements while using a fully managed platform to perform infrastructure maintenance. Quickly create powerful cloud apps using a fully managed platform from Impiger technologies. Impiger provides amazing service.
ReplyDelete